- I learned that I didn't need to sand them all before staining.
- I experimented with the stains and this Danish Oil I found. I like using the Danish Oil on the really light wood as it brings out really pretty designs. I took a picture of it because I keep forgetting the name.
 |
| Notice the difference between the untreated board and the stained portion. |
How do I arrange the planks?
I am really struggling with how to arrange the planks. I tried arranging them like you would a floor but that look might make the ceiling feel too low. Maybe covering the entire ceiling is a bad idea- who knows? I learned that if I did it like a plank floor, I'd have to have several boards the same width to complete a row. The pallet boards aren't all exactly alike. So there's progress- I'm going with the tile look with the mix of horizontals and verticals.
 |
| Plank floor arrangement |
 |
| tile arrangement (verticals and horizontals) |
Another thought on plank arrangement...maybe we go with the tile arrangement starting in the center of the room and work our way out from there. Then at the boarders where we can't fit more tiles, we do the plank floor arrangement.
How big should the sections of planks be?
I have a 10 foot width on the room. Going to start at a visible corner and work my way across the width, then work my way across the length (if that makes any sense). I keep trying to figure out how big to make each section. I have them laid out on the floor (shown above). I made a row of horizontals arranging them until I liked the size. Then I tried to get as close as I could to that size as I lined up the verticals. Doesn't really matter which ones I call horizontal or vertical as long as they make a contrast like the picture above. I also want to maximize my materials. If I only have to cut off a couple of inches from my planks, I will have very little waste.
Another factor to consider in tile size- will I be securing the planks together before they go up or putting the planks up individually to form tile like sections. A 40" square-ish tile will be very hard to hold up and secure to a ceiling by hand. If I had something that would hold it up like drywall while I secure it, that would be awesome- turns out they make just that thing!
Should I be considering the distance of the floor (ceiling) joists when figuring out how long my planks should be? I measured the distance between each one and they all vary slightly. I don't have an answer to this. I wrote 38.3 because I was able to get 2 sections to line up with each other. I'm hoping that the answer will reveal itself once I start trying to install this ceiling.
Tools for the job...
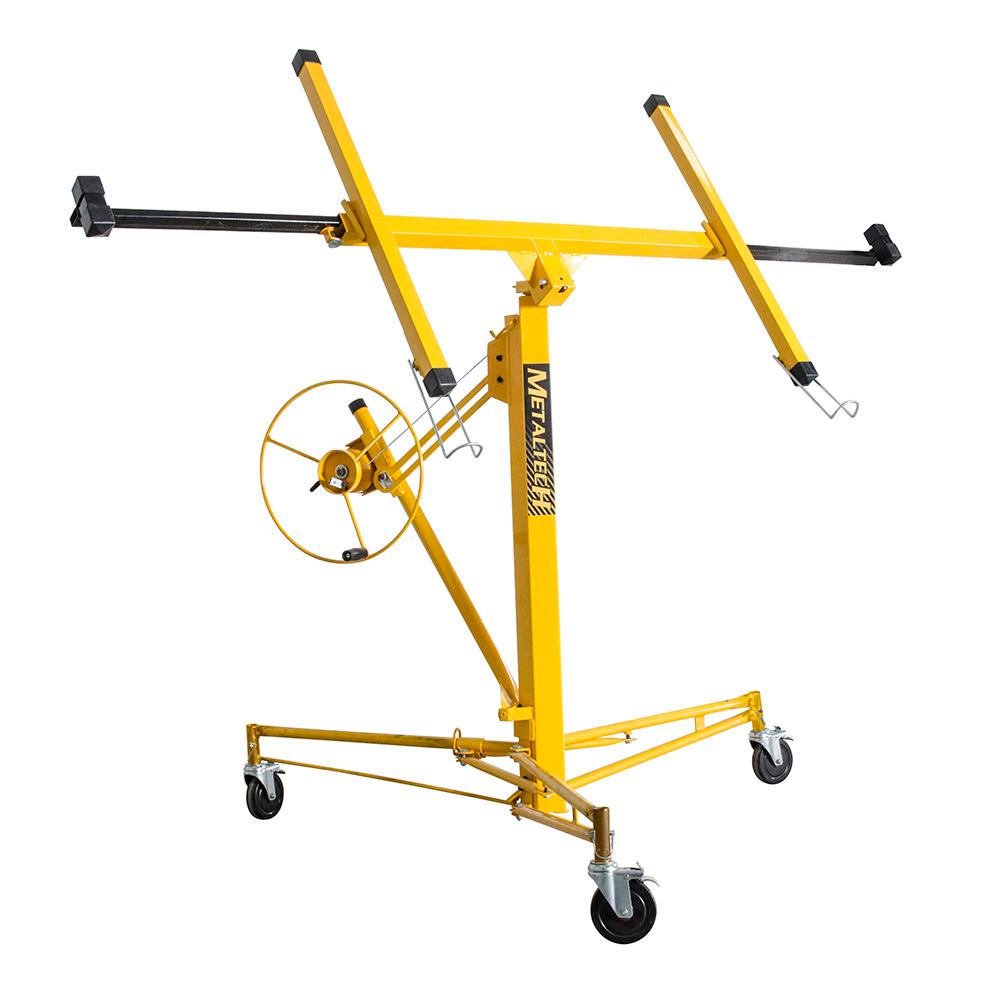 Add to the wish list- a drywall lifter. I just watched a video and it is exactly what I need. I looked at weight and length requirements and decided on this MetalTech one at Home Depot for $231.. Also, locking castor wheels are important to me. There are cheaper versions but I noticed that their wheels don't lock and the max load is definitely less. This one comes with an extension. I plan to do the ceiling in the other half of my basement in drywall so this will be useful on future projects.
In looking at the tools needed for the job, I realized that we might need something different. My husband, who at the moment isn't much help because he's recovering from a surgery, suggested that we buy a battery powered nail gun. We have one that's an attachment for an air compressor. I think that would be more powerful than a battery powered nail gun but the air compressor one is heavier because of the hose. So another decision to make.
No comments:
Post a Comment